

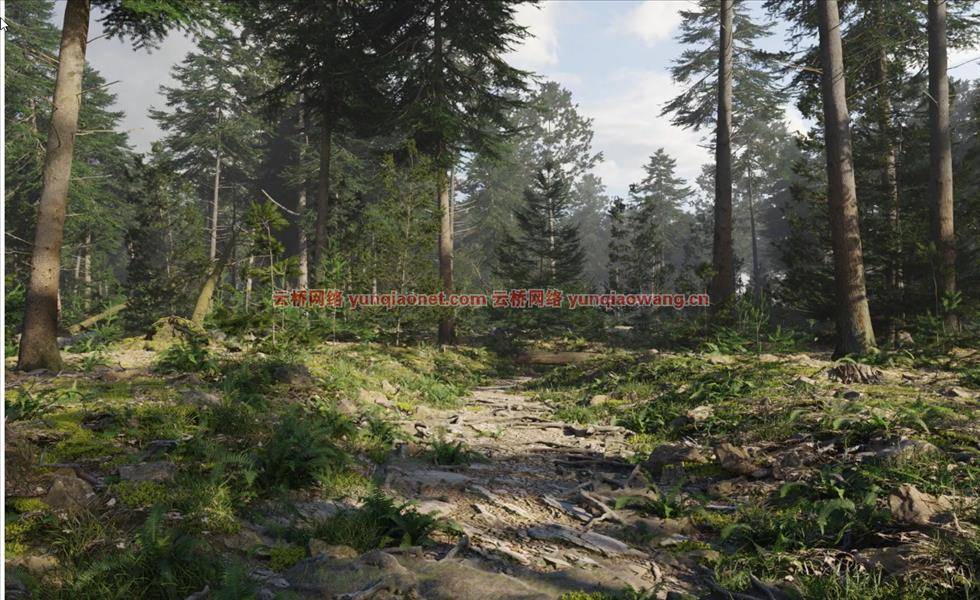
掌握在Blender中创建令人惊叹的冷杉和松树林场景的艺术,欢迎来到在Blender创建冷杉和松树林的终极指南!在本课程中,您不仅会学到创建令人惊叹的森林环境所需的一切知识,还会身临其境地体验现实生活中的森林。通过六个深入的章节,您将逐步了解森林设计流程,从最初的概念到最终产品。冷杉林和松树林是真正迷人的环境。有着高耸的树木,斑驳的阳光,和丰富的灌木丛,它们充满了细节和奇迹。从树枝在微风中沙沙作响到鸟儿在头顶歌唱,森林的每一个元素都有助于整体的美丽与和谐。在虚拟环境中捕捉这种魔力可能是一个挑战,但在本课程中,我们将一步一步地指导您创建自己的令人惊叹的森林场景。您将学习如何精心制作每个细节,从树皮的纹理到光线透过树叶的方式,让森林栩栩如生。课程结束时,你将拥有一幅捕捉到真实冷杉和松树林精髓的杰作,等待你去探索和欣赏。Creating A Fir And Pine Forest In Blender
那么这门课是关于什么的呢?本课程分为六章,每一章都旨在引导您创建一个令人惊叹的冷杉和松树林环境。在每一章中,你将一步一步地学习如何设计和优化森林的每一个元素,从最初的布局和地形塑造到赋予场景生命的最后润色。在每一章中,你都将获得建立在前一章所学基础上的新技能和见解,给你创造一个真正非凡的森林环境所需的知识和信心。课程概述第1章:简介在这一介绍性章节中,我们将对课程及其目标进行概述。您将了解3D森林设计的基本概念,并对课程的预期有所了解。
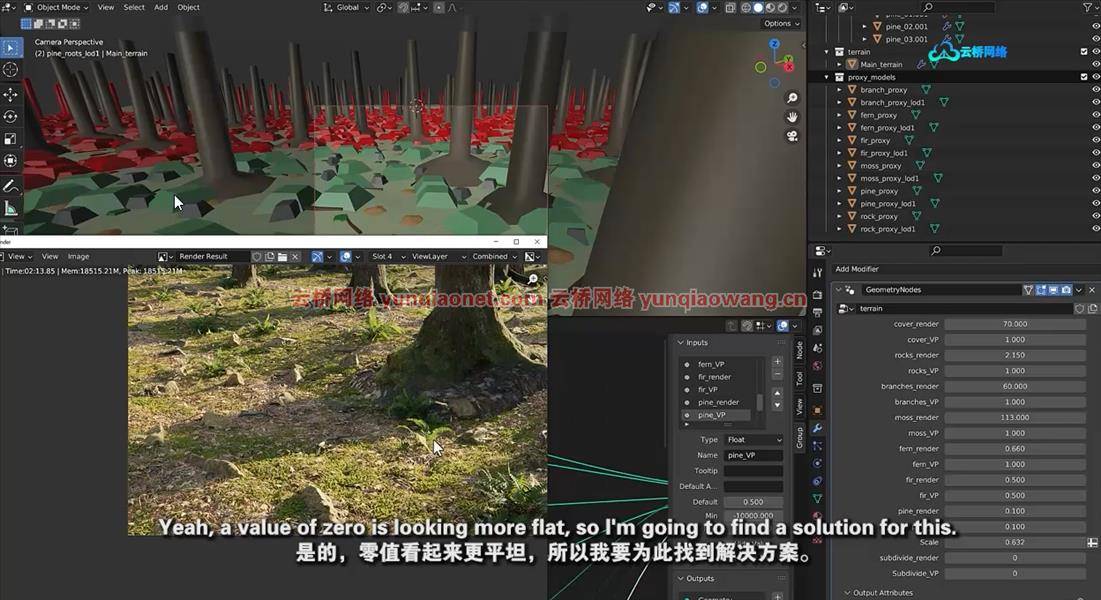
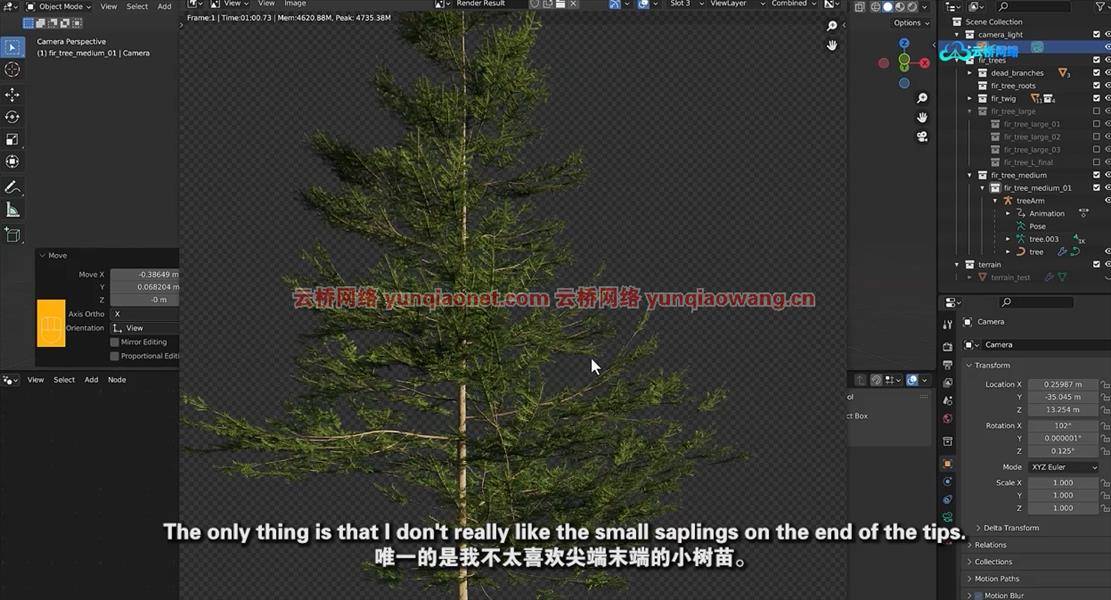
我们还将讨论入门所需的工具和资源,并向您概述森林设计过程。第2章:创建森林覆盖物在这一章中,我们将通过创建初始覆盖物来开始构建森林的基础。您将学习如何创建地面,添加树叶和草,并创建一个深度和纹理的感觉。我们还将讲述如何营造环境的灯光和氛围,为课程的其余部分打下基础。第3章:扩大表面和优化场景在这一章中,我们将深入到你的森林环境的技术方面。您将学习如何扩大场景的表面,优化其性能,并使用各种技术来创建更加真实和身临其境的体验。我们将讨论LOD(细节层次)、雾等主题。第4章:创建一条程序化的森林路径和河流在这一章中,我们将创建一条程序化的森林路径和河流。您将学习如何使用Blender的强大工具来创建这些功能,我们将向您展示如何定制它们并制作动画。我们还将介绍如何给你的场景添加看起来自然的岩石和其他特征。第5章:创造冷杉和松树在这一章中,我们将重点放在创造标志性的冷杉和松树来定义你的森林。使用现实生活中的树木扫描mo,我们将向您展示如何创建逼真和令人信服的树木。您还将学习如何制作树木的动画,包括树枝,使它们栩栩如生。第六章:在最后一章,第六章,我们将把你学到的所有东西结合在一起,创造一个有凝聚力的令人惊叹的森林环境。我们将在三个不同的场景中工作,向您展示如何使用您在整个课程中学到的技能来尝试不同的照明和纹理。为了帮助你寻找灵感和探索新的想法,我们将向你介绍mid-journey -一个寻找和分享创造性灵感的强大工具Blender技能水平:中级本课程是为中级Blender用户设计的,他们熟悉基本知识并对Blender界面有很好的理解。然而,即使您相对来说是Blender的新手,您仍然可以跟随课程并从课程中学到很多东西。如果你愿意花时间和精力来练习这些技巧,在这门课程的帮助下,你将能够创作出令人惊叹的3D艺术品。
Blender松树林场景制作视频教程,本课程使用的所有内容,包括8K纹理、照片扫描和其他自然物体,都可以在Polyhaven平台上免费获得(2023年6月)。这意味着您可以使用相同的优质资源在Blender中创建自己的惊艳针叶林!不要等待,现在就加入吧!在本课程结束时,您不仅将拥有在Blender中创建令人惊叹的森林环境的技能和知识,还将对现实生活中的森林有一个新的认识和理解。您将能够定制和个性化您的创作,使其真正独特和个性化。那么为什么要等呢?立即注册,让我们踏上通往森林中心的旅程!
MP4 |视频:h264,1280×720 |语言:英语+中英文字幕(云桥网络 机译) |时长:19小时2分钟 含课程文件
你会学到什么
如何使用Blender创建令人惊叹的冷杉和松树林环境?
使用曲线将动态元素添加到场景中的程序路径和河流创建。
创建动画照片扫描的冷杉和松树
高级场景优化确保流畅的性能和高效的渲染。
要求
参加本课程需要具备Blender的相关知识。
本课程是为有抱负的3D艺术家和Blender爱好者设计的,他们希望提高自己创造真实的冷杉和松树林场景的技能。
Master the Art of Creating Stunning Fir and Pine Forest Scenes in Blender
What you’ll learn
How to create stunning fir and pine forest environments using Blender.
Procedural path and river creation using curves to add dynamic elements to your scenes.
Creating animated photoscanned fir and pine trees
Advanced scene optimization ensure smooth performance and efficient rendering.
Requirements
Prior knowledge of Blender is required to enroll in this course.
Description
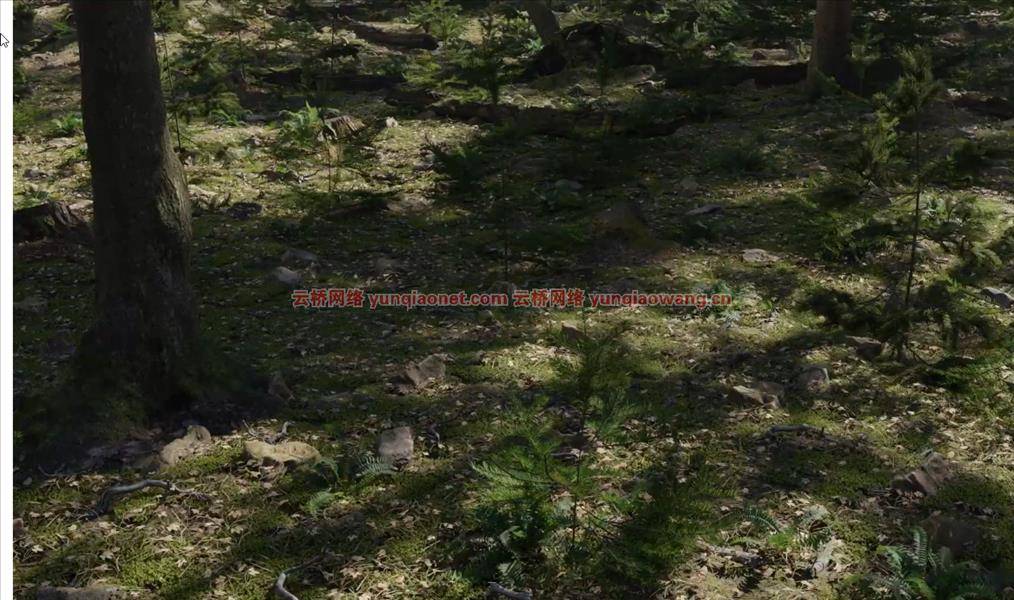
Welcome to the ultimate guide to creating a fir and pine forest in Blender! In this course, you’ll not only learn everything you need to know to create a stunning forest environment, but you’ll also be taken on an immersive experience to real-life forests. With six in-depth chapters, you’ll be guided step-by-step through the forest design process, from initial conception to final product.Fir and pine forests are truly enchanting environments. With their towering trees, dappled sunlight, and rich undergrowth, they’re full of detail and wonder. Every element of the forest contributes to its overall beauty and harmony, from the way the twigs rustle in the breeze to the sound of the birds singing overhead. Capturing this magic in a virtual environment can be a challenge, but in this course, we’ll guide you step by step through the process of creating your own stunning forest scene. You’ll learn how to carefully craft each detail to bring the forest to life, from the texture of the bark to the way the light filters through the leaves. By the end of the course, you’ll have a masterpiece that captures the essence of a real fir and pine forest, ready to be explored and enjoyed. So what is this course all about ?The course is organized into six chapters, each designed to guide you through the process of creating a breathtaking fir and pine forest environment. In each chapter, you’ll learn step-by-step how to design and optimize each element of the forest, from the initial layout and terrain shaping to the final touches that bring the scene to life. With each chapter, you’ll gain new skills and insights that build upon what you learned in the previous one, giving you the knowledge and confidence you need to create a truly remarkable forest environment.Course overviewChapter 1: Introduction In this introductory chapter, we’ll give you an overview of the course and its objectives. You’ll learn about the basic concepts of 3D forest design, and get a sense of what to expect from the course. We’ll also discuss the tools and resources you’ll need to get started, and give you an overview of the forest design process.Chapter 2: Creating the Forest Cover In this chapter, we’ll start building the foundation of your forest by creating the initial cover. You’ll learn how to create the ground, add foliage and grass, and create a sense of depth and texture. We’ll also cover how to create the lighting and mood of the environment, setting the stage for the rest of the course.Chapter 3: Enlarging the Surface and Optimizing the Scene In this chapter, we’ll dive deeper into the technical aspects of your forest environment. You’ll learn how to enlarge the surface of your scene, optimize it for performance, and use various techniques to create a more realistic and immersive experience. We’ll cover topics like LOD (level of detail), fog, and more.Chapter 4: Creating a Procedural Forest Path and River In this chapter, we’ll create a procedural forest path and river. You’ll learn how to use Blender’s powerful tools to create these features, and we’ll show you how to customize and animate them. We’ll also cover how to add natural-looking rocks and other features to your scene.Chapter 5: Creating the Fir and Pine Trees In this chapter, we’ll focus on creating the iconic fir and pine trees that define your forest. Using scanned mo of real-life trees, we’ll show you how to create lifelike and convincing trees. You’ll also learn how to animate the trees, including the twigs, to bring them to life.Chapter 6: In the final chapter, Chapter 6, we’ll bring everything you’ve learned together to create a cohesive and breathtaking forest environment. We’ll work on three different scenes, showing you how to use the skills you’ve learned throughout the course to experiment with different lighting and textures. And to help you find inspiration and explore new ideas, we’ll introduce you to mid-journey – a powerful tool for finding and sharing creative inspirationBlender skill level: Mid-levelThis course is designed for intermediate Blender users who are comfortable with the basics and have a good understanding of the Blender interface. However, even if you are relatively new to Blender, you can still follow along and learn a lot from the course. If you’re willing to put in the time and effort to practice the techniques, you’ll be able to create stunning 3D artwork with the help of this course.All of the content used in this course, including 8K textures, photo scans, and other natural objects, is available for free on the Polyhaven platform ( June 2023). This means you can use the same high-quality resources to create your own stunning coniferous forest in Blender!Don’t wait, and join nowBy the end of this course, you’ll not only have the skills and knowledge to create a stunning forest environment in Blender, but you’ll also have a newfound appreciation and understanding of real-life forests. You’ll be able to customize and personalize your creation, making it truly unique and personal. So why wait? Enroll now and let’s embark on a journey to the heart of the forest!
学习概要:
Section 1: Introduction
Lecture 1 Introduction
Lecture 2 Lecture 1: A forest is not just trees
Lecture 3 Lecture 2: Location visit
Lecture 4 Lecture 3: Workflow and organization
Lecture 5 Lecture 4: Using AI in your work
Lecture 6 Lecture 5: scheduling your work
Section 2: Chapter 2 – Building the forest floor
Lecture 7 Introduction video
Lecture 8 Lecture 1: starting and preparing Blender
Lecture 9 Lecture 2: preparing the forest floor
Lecture 10 Lecture 3: Adding terrain/texture displacement
Lecture 11 Lecture 4: Adding scene displacement
Lecture 12 Lecture 5: Making ground cover
Lecture 13 Lecture 6: scatter ground cover with Geometry nodes
Lecture 14 Lecture 7: Importing rocks and branches
Lecture 15 Lecture 8: Scatter the rock and branches
Lecture 16 Lecture 9: Modeling moss
Lecture 17 Lecture 10 : Building a moss patch
Lecture 18 Lecture 11: Scatter moss patches on the terrain
Lecture 19 Lecture 12: Making model proxy’s
Lecture 20 Lecture 13: Balance the scene
Lecture 21 Lecture 14: Add fern and make a scene render
Section 3: Chapter 3 – Scale and optimize the forest template
Lecture 22 Introduction video
Lecture 23 Lecture 1: Scale template and lower scene assets count
Lecture 24 Lecture 2: Add prop culling
Lecture 25 Lecture 3: Add LOD on your models
Lecture 26 Lecture 4: Add more LOD detail
Lecture 27 Lecture 5: Balance the culling and LOD
Lecture 28 Lecture 6: Make tree root proxy models
Lecture 29 Lecture 7: Make a scene render
Lecture 30 Lecture 8: Add pine tree roots
Lecture 31 Lecture 9: Optimize nodes by making groups
Lecture 32 Lecture 10 : Adding a dead tree model
Lecture 33 Lecture 11: Make a scene render
Section 4: Chapter 4 – Adding a procedural path and river
Lecture 34 Introduction video
Lecture 35 Lecture 1: Using AI images for path and river inspiration
Lecture 36 Lecture 2: Drawing a path with curves
Lecture 37 Lecture 3: exclude models on the path
Lecture 38 Lecture 4: Adding a path texture
Lecture 39 Lecture 5: Scatter the path
Lecture 40 Lecture 6: Adding grass on path sides
Lecture 41 Lecture 7: Drawing a river curve on the terrain
Lecture 42 Lecture 8: Add a river material
Lecture 43 Lecture 9: Build a river with curves
Lecture 44 Lecture 10: Extracting X and Y coordinates from curve
Lecture 45 Lecture 11: Add river displacement and flow the river
Lecture 46 Lecture 12: using reference video to improve river looks
Lecture 47 Lecture 13: Lower river flow intensity on sides
Lecture 48 Lecture 14: Add river material
Lecture 49 Lecture 15 : Make river foam
Lecture 50 Lecture 16: Blend the river foam
Lecture 51 Lecture 17: Append river on terrain curve
Lecture 52 Lecture 18: Add river rocks
Lecture 53 Lecture 19: Add river scattering
Lecture 54 Lecture 20: Add more river rocks
Lecture 55 Lecture 21: Make a scene render
Section 5: Chapter 5 – Building fir and pine trees
Lecture 56 Introduction video
Lecture 57 Lecture 1: Looking at fir and pine reference photos
Lecture 58 Lecture 2: Making a fir twig branch
Lecture 59 Lecture 3: Modeling a fir twig needle
Lecture 60 Lecture 4: Adding fir needles on branch
Lecture 61 Lecture 5: Adding needles on left and right side branch
Lecture 62 Lecture 6: Adding needles on the tips of the branch
Lecture 63 Lecture 7: Make fir twig variation
Lecture 64 Lecture 8: Introduction to the Blender sapling tool
Lecture 65 Lecture 9: Building and animating the fir tree
Lecture 66 Lecture 10: Adding twigs in geometry nodes
Lecture 67 Lecture 11: Merge a scanned fir root
Lecture 68 Lecture 12: Blend root and branch materials
Lecture 69 Lecture 13: Animate tree root
Lecture 70 Lecture 14: optimizing fir twigs
Lecture 71 Lecture 15: add more detail on fir twig
Lecture 72 Lecture 16: Add dead branches on the tree root
Lecture 73 Lecture 17: Build a tree template to display your trees
Lecture 74 Lecture 18: make a second fir tree
Lecture 75 Lecture 19: Merge tree root and blend materials
Lecture 76 Lecture 20: Animate the tree root
Lecture 77 Lecture 21: Make a third fir tree
Lecture 78 Lecture 22: Animate tree root
Lecture 79 Lecture 23 : replace dead branches on the root with a smaller type
Lecture 80 Lecture 24: Add all fir trees on template and make a render
Lecture 81 Lecture 25: Make a medium fir tree
Lecture 82 Lecture 26: make medium fir variations
Lecture 83 Lecture 27: Make a fir sapling tree
Lecture 84 Lecture 28: Blend all trees on the tree template
Lecture 85 Lecture 29: Model a pine needle
Lecture 86 Lecture 30: Make needle variations and add a material
Lecture 87 Lecture 31: Model a pine twig and add needles
Lecture 88 Lecture 32: Adjust needles and face the right direction
Lecture 89 Lecture 33: Make pine twig variations
Lecture 90 Lecture 34: Build the pine tree and add the wigs
Lecture 91 Lecture 35: Merge the pine root and blend materials
Lecture 92 Lecture 36: Animate tree root
Lecture 93 Lecture 37: Add dead branches on pine tree
Lecture 94 Lecture 38: Model a medium pine tree
Lecture 95 Lecture 39: Model a pine sapling and blend all trees on tree template
Section 6: Chapter 6 – making scene renders
Lecture 96 Introduction video
Lecture 97 Lecture 1: reviewing all tree assets
Lecture 98 Lecture 2: make fir tree proxy models and import in new scene file
Lecture 99 Lecture 3: Import medium and sapling trees and balance the size
Lecture 100 Lecture 4: change the light and atmosphere of the scene
Lecture 101 Lecture 5: Import pine trees in scene file
Lecture 102 Lecture 6 : balance tree models to bring more light in the scene
Lecture 103 Lecture 7: Improve the river looks
Lecture 104 Lecture 8: Using Mid Journey to find scene inspiration
Lecture 105 Lecture 9: work out the first scene
Lecture 106 Lecture 10: Replace grass with a mixt nature assets
Lecture 107 Lecture 11: Adding path roots
Lecture 108 Lecture 12: Balance the path roots
Lecture 109 Lecture 13: Match the root color with path material
Lecture 110 Lecture 14: Draw a new path and river for new scene setup
Lecture 111 Lecture 15: make scene renders and balance the scene
Lecture 112 Lecture 16: change the atmosphere and make a final scene render
Lecture 113 Lecture 17: Change the scene template and draw a new river curve
Lecture 114 Lecture 18: Change scene light and make new renders
Lecture 115 Lecture 19: Change the scene template for a new scene render
Lecture 116 Lecture 20: Draw a new river curve
Lecture 117 Lecture 21: Create volume foggy clouds
Lecture 118 Lecture 22: Blend the foggy clouds with scene template
Lecture 119 Lecture 23: final scene notes
This course is designed for aspiring 3D artists and Blender enthusiasts looking to enhance their skills in creating realistic fir and pine forest scenes.
1、登录后,打赏30元成为VIP会员,全站资源免费获取!
2、资源默认为百度网盘链接,请用浏览器打开输入提取码不要有多余空格,如无法获取 请联系微信 yunqiaonet 补发。
3、分卷压缩包资源 需全部下载后解压第一个压缩包即可,下载过程不要强制中断 建议用winrar解压或360解压缩软件解压!
4、云桥网络平台所发布资源仅供用户自学自用,用户需以学习为目的,按需下载,严禁批量采集搬运共享资源等行为,望知悉!!!
5、云桥网络-CG数字艺术学习与资源分享平台,感谢您的赞赏与支持!平台所收取打赏费用仅作为平台服务器租赁及人员维护资金 费用不为素材本身费用,望理解知悉!

评论(0)